How to use Open NavG
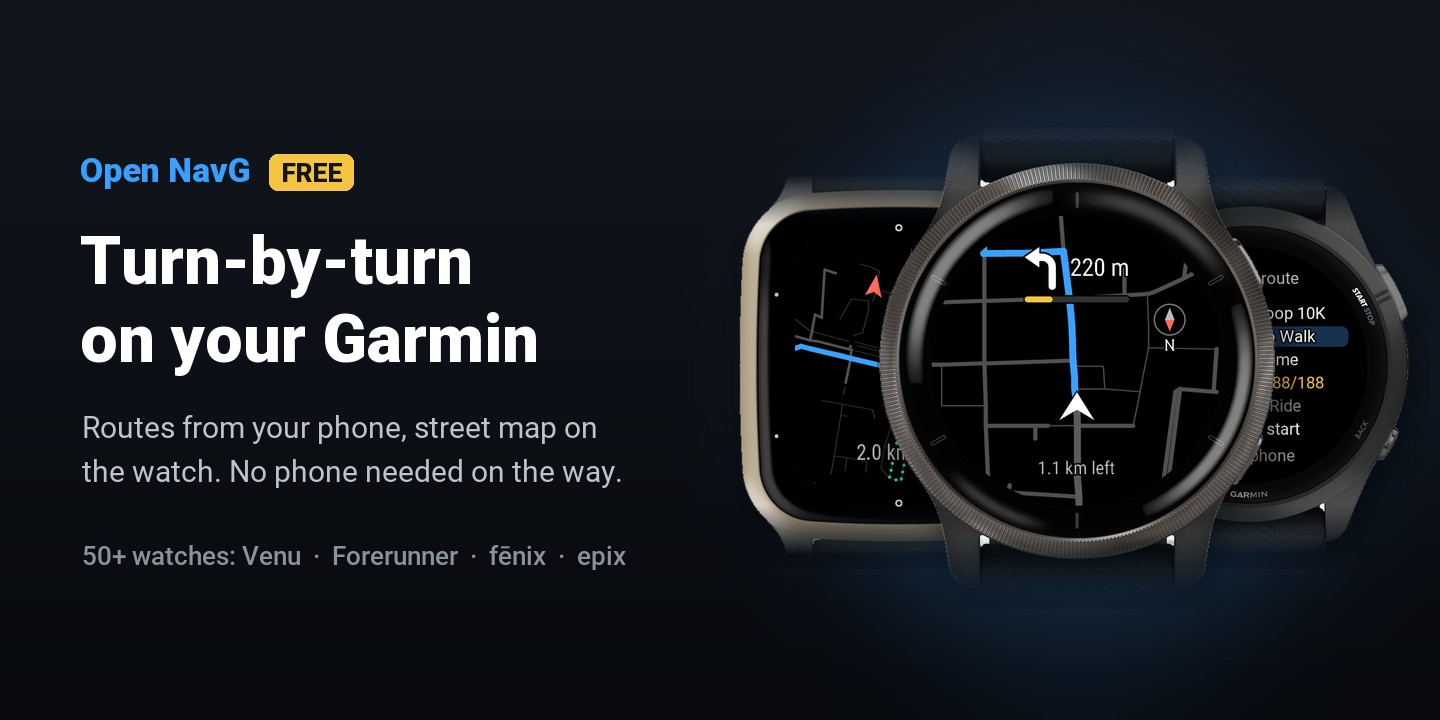
Free directions at every turn, with a street map, on your Garmin watch. Not made by Garmin and not linked to Garmin.
- Add the Open NavG screen to your activity (once).
- Make a route on your phone.
- Paste it into a slot in Open NavG's settings.
- Open the activity without Start: the watch downloads it.
- Press Start and follow the arrows.
What you need
- A supported watch (50+) with up-to-date software. Find yours in Step 1.
- A phone (iPhone or Android) with Garmin Connect, connected to the watch. Internet on the phone while the watch downloads routes.
- Open NavG installed from the Connect IQ Store (Connect IQ app).
Step 1. Add the Open NavG screen (once)
- Open NavG is a data field: one screen inside an activity (Run, Bike, Walk …), not a watch face or an app.
- Add it on the watch: the Garmin Connect app often cannot put Connect IQ fields on a data screen.
- Give it a screen of its own with 1 field.
- One activity holds at most 2 Connect IQ fields (Garmin FAQ). The Connect IQ category may be named a little differently, e.g. Connect IQ Fields (Forerunner 165, vívoactive 5).
- Riding a motorbike? See Motorbike mode first.
Open the menu style of your watch below. Menu names are shown as on a watch set to English and can differ slightly between models and software versions.
Venu 2 style menu Venu 2 / 2S / 2 Plus, Venu Sq 2 / Sq 2 Music, D2 Air X10, Mercedes-Benz Venu 2 / 2S
- From the watch face, press A (the top-right button). The activity list opens.
- Select the activity (Run, Walk …).
- On the activity's start screen (Wait for GPS), swipe up (the arrow at the bottom) to open the menu.
- Select Settings.
- Select Data Screens.
- Pick a screen you don't need (in the pictures: Screen 2) and turn it on.
- Select Layout and choose the layout with one field. The Layout line then reads 1 Fields.
- Select Edit Data Fields, choose the Connect IQ category, then Open NavG.
Another way in: from the watch face hold B → ⚙ → Activities & Apps → the activity → its settings → Data Screens. Then go on at step 6.
- Venu 2 Plus: a third button (C), the same steps.
- Venu Sq 2 / Sq 2 Music: square screen, the same steps.
- D2 Air X10: its manual uses Another way in (above). Use it if steps 1–3 look different.
- Mercedes-Benz Venu 2 / 2S: we found no separate Garmin manual. Try the Venu 2 steps and tell us if your menu differs.
Some of these pictures follow photos or videos of a real , redrawn in our own simple style. Steps we found no picture of are drawn in a plain, generic style.
Garmin manual: Customizing the Data Screens (Venu 2)
Venu 3 style menu Venu 3 / 3S, vívoactive 5
- Press A (the Action button).
- Select the activity (Run, Bike, Walk …).
- On the activity's start screen (Wait for GPS), swipe up (or select the arrow at the bottom) to open the menu.
- Select Settings (the activity settings).
- Select Data Screens.
- Pick a screen you don't need (in the pictures: Screen 2) and turn it on.
- Select Layout and choose the layout with one field.
- Select the screen, then Edit Data Fields. Choose the Connect IQ category, then Open NavG.
- vívoactive 5: two buttons instead of three, the same steps.
Some of these pictures follow photos or videos of a real , redrawn in our own simple style. Steps we found no picture of are drawn in a plain, generic style.
Garmin manual: Customizing the Data Screens (Venu 3)
Venu 4 style menu Venu 4, vívoactive 6, Venu X1, D2 Air X15, Approach S72
- From the watch face, swipe left (or press START, the top button).
- Select Activities, then the activity.
- Scroll down and select the activity settings (for example Run Settings).
- Select Data Screens.
- Select Add New for a new screen (or scroll to a screen you don't need).
- On that screen, swipe left, select Layout and choose the layout with one field.
- Tap the field, swipe to the Connect IQ category and select Open NavG.
- If you like: swipe left › Reorder to make it the last screen.
- Venu X1: square screen; layouts from 1 to 8 fields.
- D2 Air X15: its manual says swipe left from the watch face; the rest is the same.
- Approach S72: in step 2 select the activities symbol, then the activity.
Some of these pictures follow photos or videos of a real , redrawn in our own simple style. Steps we found no picture of are drawn in a plain, generic style.
Garmin manual: Customizing the Data Screens (Venu 4)
5-button watches Forerunner 165 / 255 / 265 / 955 / 965, fēnix 7, epix, Enduro 2, MARQ, tactix 7, D2 Mach 1, Descent
- From the watch face, hold the middle button on the left: UP on a Forerunner, MENU on the others (labelled UP·MENU, or MENU·UP on the Descent G2).
- Select Activities & Apps, then the activity (Run, Bike …).
- Select the activity settings (for example Run Settings).
- Select Data Screens, scroll down and select Add New.
- Select Custom Data (on the Forerunner 165 the watch first asks Choose Screen), then the layout with one field.
- Select the field (Field 1), choose the Connect IQ category, then Open NavG.
- If you like: Reorder to make it the last screen. During the activity, scroll to it with UP / DOWN.
- Shortcut (Forerunner 165 / 255 / 265 / 955 / 965): press START, select the activity, then hold UP on its start screen. Go on at step 4 (at step 3 if a menu shows first).
- Forerunner 955 / 965: the UP button carries the menu symbol.
- Forerunner 255 / 255S (also Music): no touchscreen. Scroll with UP / DOWN and select with START.
- Descent G2: the button is MENU·UP, the last item is Add. Use an activity that is not a dive.
- Descent G2 shortcut (seen in Garmin's video): hold MENU·UP on the activity's start screen, then go on at step 4.
- Descent Mk3 / Mk3i: use an activity that is not a dive (dives are set up in Dive Setup).
- fēnix 7 / 7X Pro Solar without Wi-Fi: not named in Garmin's fēnix 7 manual. The steps should be the same; tell us if your menu differs.
Some of these pictures follow photos or videos of a real , redrawn in our own simple style. Steps we found no picture of are drawn in a plain, generic style.
Garmin manuals: Forerunner 165 · fēnix 7
Forerunner 70 / 170 / 570 also 170 Music, 570 42 / 47 mm
- From the watch face, press the upper-right button.
- Select Activities, then the activity.
- Scroll down and select the activity settings.
- Select Data Screens, then Add New for a new screen. (Or scroll to a screen you don't need and select the Edit symbol.)
- Select Layout and choose the layout with one field.
- Select Data Fields, then the field, the Connect IQ category and Open NavG.
- Buttons are named by place (upper-left, middle-left, lower-left, upper-right, lower-right). Menu names after Add New may differ a little.
Some of these pictures follow photos or videos of a real , redrawn in our own simple style. Steps we found no picture of are drawn in a plain, generic style.
Garmin manual: Customizing the Data Screens (Forerunner 570)
Approach S50 and S70 S50, S70 42 / 47 mm (S72: Venu 4 style)
Approach S50
- Press the Top button.
- Select the More activities symbol, then the activity.
- Select the Settings symbol ⚙, then the activity settings.
- Select Data Screens, pick a screen you don't need and turn it on.
- Select the screen, then Layout, and choose the layout with one field.
- Select the screen, then Edit Data Fields, the Connect IQ category and Open NavG.
Some of these pictures follow photos or videos of a real , redrawn in our own simple style. Steps we found no picture of are drawn in a plain, generic style.
Garmin manual: Customizing the Data Screens (S50)
Approach S70
- Press the action button.
- Select the More activities symbol, then the activity.
- Select the Settings symbol ⚙, then the activity settings.
- Select Data Screens, then Add New for a new screen. (Or swipe to a screen you don't need and press the action button.)
- Select Layout and choose the layout with one field.
- Select the field, the Connect IQ category and Open NavG.
Garmin manual: Customizing the Data Screens (S70)
The watch pictures are illustrations: your watch can look a little different. Menu names are shown as on a watch set to English and can differ slightly between models and software versions.
Step 2. Make a route
With the Planner (recommended)
- Open the Planner on your phone.
- Pick a tab:
- To destination: from where you are to a place (see What you can paste), or tap the map. Not the way you want? Tap the blue line to add a point and drag it to another street.
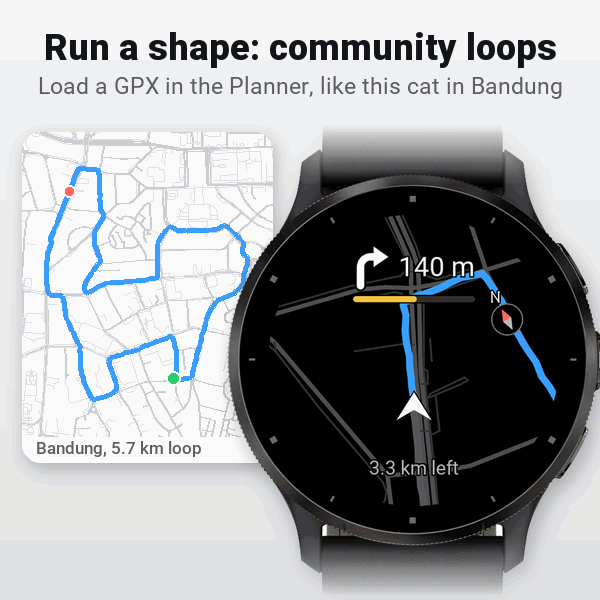
- Import GPX: a route file (.gpx) from a friend or a running club, or a shared loop (even a drawing made with GPS).
- Draw: tap points on the map in order; the route follows the roads.
- If you like (To destination and Draw): Avoid toll roads (on by default), Shortest distance, Round trip.
- Tap Copy route code.
Or with Google Maps numbers
- In Google Maps, press and hold the destination until a red pin appears.
- Tap the numbers in the search bar (or the panel below) to copy them, e.g.
-6.2185, 106.8019. The brackets the app adds are fine. - Paste them into a slot (Step 3).
What you can paste
| Text | In a slot (phone) | In the Planner |
|---|---|---|
Planner code NAVG2L:… (Copy route code button) | ✅ Best: no GPS needed | – |
Numbers -6.2185, 106.8019, also in brackets (-6.2185, 106.8019) or 6.2185 S, 106.8019 E | ✅ Needs the watch GPS | ✅ |
Degrees, minutes, seconds 6°13'06.6"S 106°48'06.8"E | ❌ Use the Planner | ✅ |
Plus Code HQ76+H8 Banjarbaru (the line with the Plus Code on a place in Google Maps: tap to copy) | ❌ Use the Planner | ✅ Easiest |
Long Google Maps link of a place you opened (google.com/, from the browser's address bar) | ❌ Use the Planner | ✅ |
Short link maps.app., the text from the Share button, or a list of search results (…/maps/) | ❌ | ❌ Copy the Plus Code or the numbers |
| A place name or an address, like Gedung Sate | ❌ | ❌ Not searched (names in Google Maps and OpenStreetMap often differ) |
- Copy only the code. A quote or full stop a chat app adds at the end does no harm.
Step 3. Put the route in a slot
Open the settings
In the Connect IQ app on your phone:
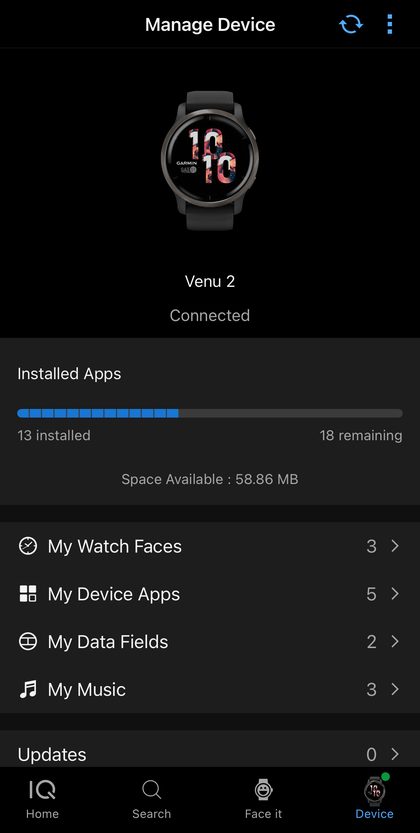 1 Tap Device (bottom right), then My Data Fields.
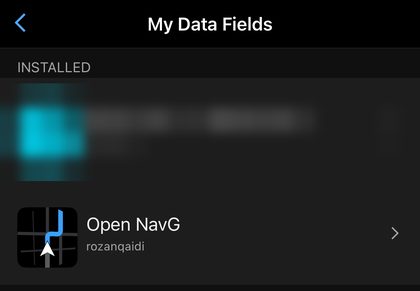 2 Tap Open NavG.
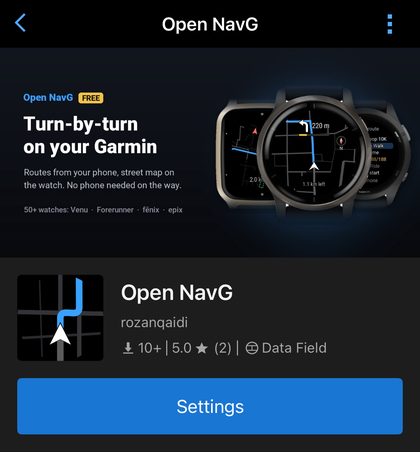 3 Tap Settings.
- Several watches? First pick one: three dots (top right) → Select a Device.
- Garmin Connect app instead: More (bottom right) → Garmin Devices → your watch → Activities & Applications → the app category → Open NavG → Settings.
Fill in a slot
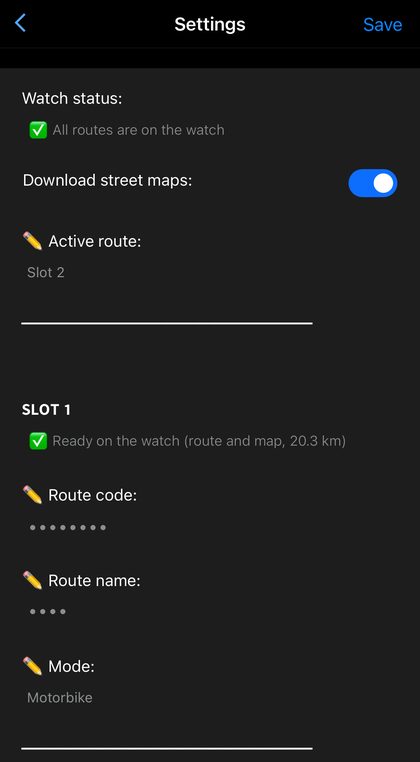 4 The settings page, with 5 slots. You fill in only the ✏️ rows.
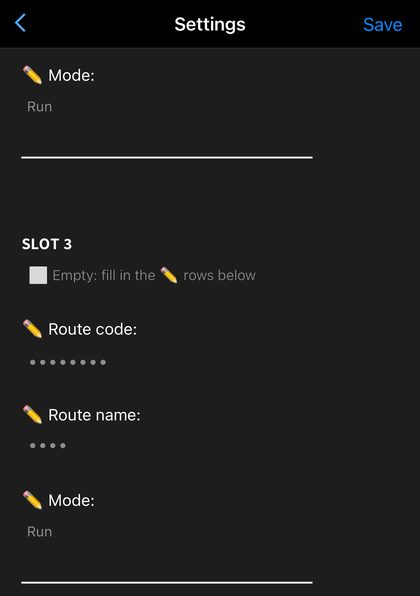 5 In an empty slot:
- ✏️ Route code: paste the code
- ✏️ Route name: shown in the watch's list
- ✏️ Mode: Run, Bike or Motorbike
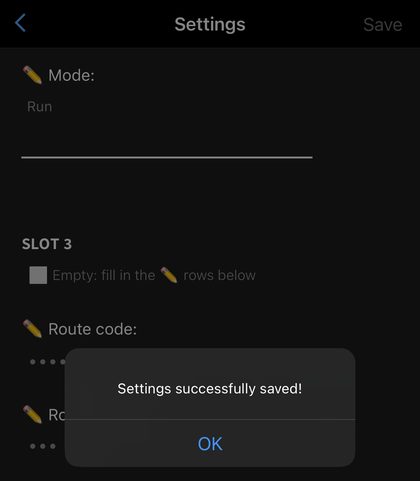 6 Tap Save (top right), then OK. The slot still says Empty until the watch reads it (Step 4).
Pictures: Connect IQ app on an iPhone, in English (November 2026). Android can look a little different. Dots hide our route codes and names.
- An iPhone may show the code as
navg2l:…in small letters. That is fine. - Download street maps: leave it on. Off = no street map for new routes (maps already on the watch stay).
- A slot keeps its route until you change or empty the code.
- ✏️ Active route: see Choose a route.
- Row titles follow the phone's language, status lines the watch's.
- Save shows an error? See Something wrong?
Step 4. Download to the watch
- On the watch, open the activity with the Open NavG screen. Don't press Start. Keep the phone nearby.
- The watch downloads each route and the streets around it (about 1 minute per 10 km).
- 2 short buzzes = done. Press Back to leave (nothing is recorded).
- Routes and maps stay on the watch: you can go without the phone.
On the phone (if you like)
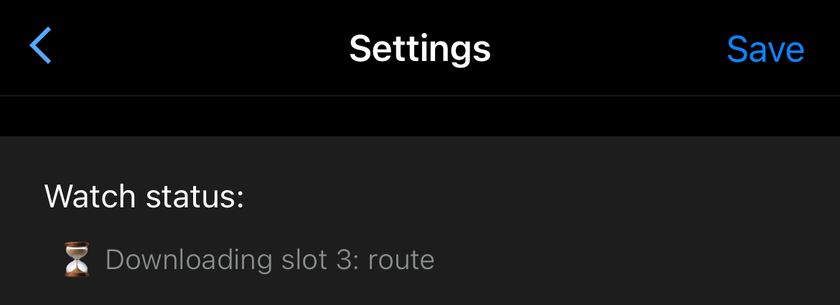 While it downloads
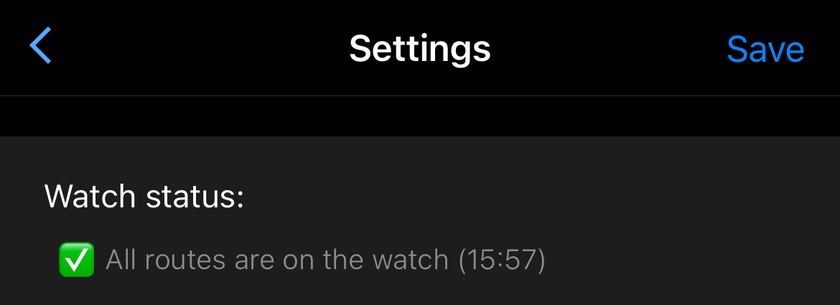 Done
 And under each slot
- ✅ ready, ⏳ busy or waiting, ❌ needs a fix, ⬜ empty.
- The page does not refresh itself: go back and open Settings again.
- Pasted Google Maps numbers? The watch needs GPS first: go outdoors.
- One long buzz, or none? See Something wrong?
Step 5. Navigate
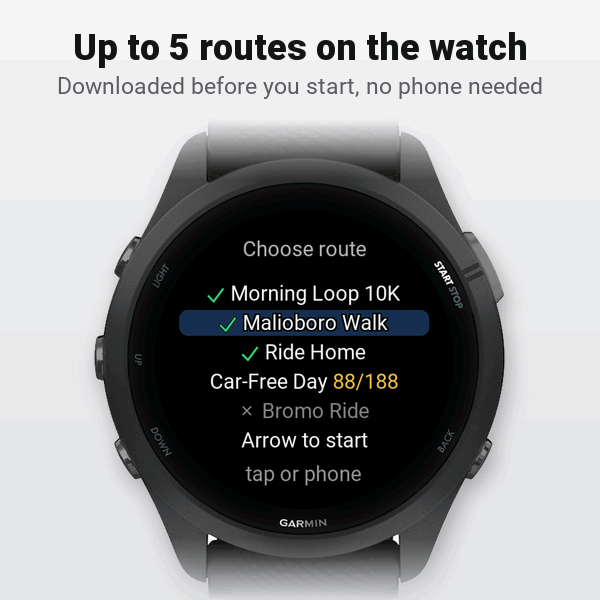
Choose a route
- Press Start and scroll to the Open NavG screen.
- Tap a route under Choose route:
- ✓ route and map ready
- yellow numbers (e.g. 12/40): map still downloading
- grey ✗: not on the watch yet
- Arrow to start: points back to where you started the activity
- blue box: the route that is running (before Start: the Active route)
Or choose on the phone:
- ✏️ Active route: Slot 2
- Forerunner 255 / 255S (no touchscreen), or tapping the list does nothing: choose the route here.
- ✏️ Active route → a slot (or Arrow to start) → Save. The route opens by itself after Start.
- Changed during the activity (phone nearby)? The watch switches routes.
- Off (tap on watch): you choose on the watch.
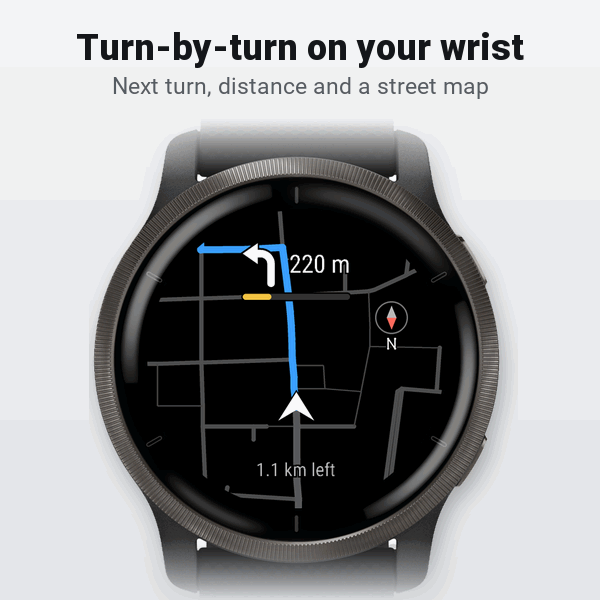
What the screen shows
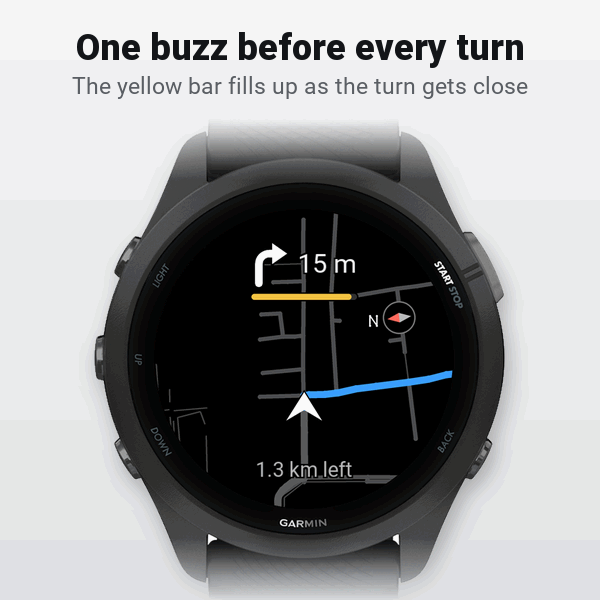
- Next turn: arrow and distance. The yellow bar fills as it gets close. One buzz about 20 m before it.
- Map: route ahead in blue, done part in grey, N for north, distance left.
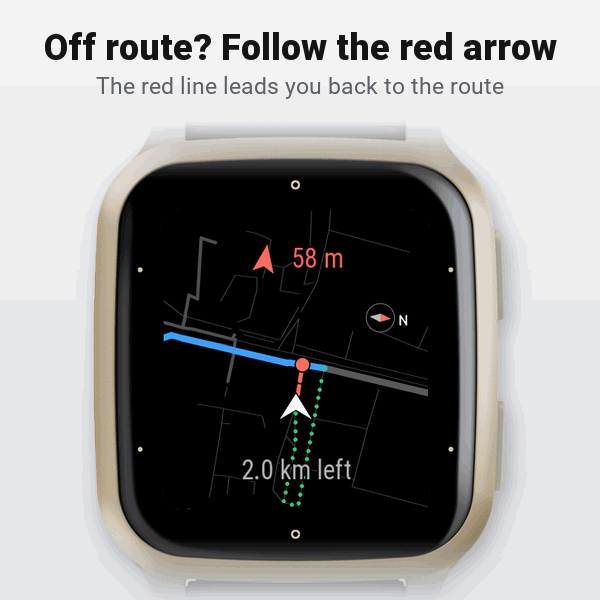
- Off route (over 40 m away for about 10 s): red arrow and line back, and a buzz. Back on it: ✓ back on route.
- Arrived: a long buzz.
- Tap the screen to open the route list again.
Motorbike mode
Set up:
- On the watch: copy the Bike activity and add the Open NavG screen to the copy (Step 1).
- On the phone: ✏️ Mode Motorbike for the slot (Step 3).
What changes:
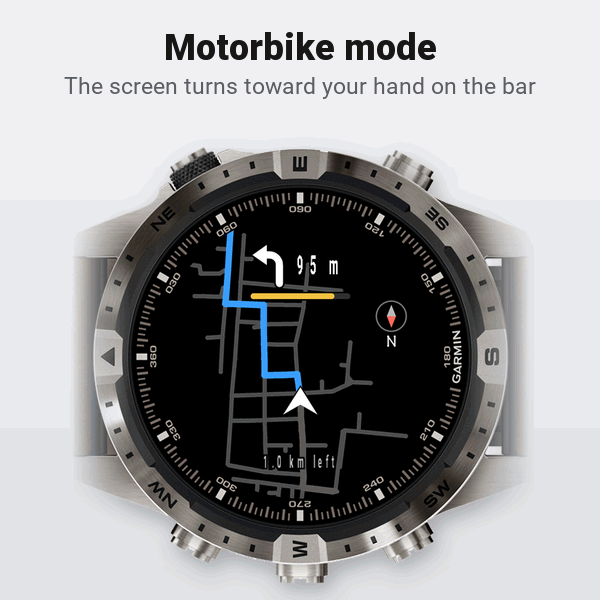
- The whole screen turns 90°, so the way ahead points to your hand on the handlebar (watch on the left wrist).
- The map zooms out to show further ahead, with roads only (no alleys).
- The turn buzz comes earlier at speed: about 3 seconds before the turn, at least 30 m.
- Off route starts at 50 m from the route instead of 40 m.
Something wrong?
| You see | What to do |
|---|---|
| Use 1-field layout | Open NavG is in a screen with several fields. Put it in a 1-field screen (Step 1). |
| Not on watch yet | The route is not downloaded yet: do Step 4 again. |
| One long buzz, or no buzz | Reopen the settings and look for ❌ or ⏳. Long buzz: downloads ended, but a slot needs a fix or GPS. No buzz: nothing was downloaded (all already on the watch, a slot retries later, or the new slot needs a fix or GPS). |
| Add a route name | Fill in ✏️ Route name and Save. |
| Code damaged: copy it again from the Planner | Part of the code was lost while pasting. Copy it again; the route already on the watch stays. |
| Code not recognised | The text is not a Planner code or Google Maps numbers (numbers with a dot, like -6.2, 106.8). See What you can paste. |
| GPS needed: go outside or use the Planner | Go outdoors, or make the route in the Planner. |
| No connection: open Garmin Connect | Open Garmin Connect on the phone and keep Bluetooth and internet on. The watch tries again by itself. |
| No route found: try a nearer point, or the Planner for a long route | No way was found, or the place is too far (more than about 150 km by road). Make the route in the Planner. |
| Downloads paused while navigating | A route is open. After you arrive, tap the screen (or pick Arrow to start) and downloads go on. |
| Watch memory full or route only, map full | Empty a slot you no longer need. |
| Phone: We are unable to update your setting | A Garmin Connect problem, not your route. Wait about 30 s, close the activity on the watch, Save again, then reopen the settings to check. |
More
- Planner · Privacy policy · Source code and issues (GitHub)
- Free and open source, no ads, no account. Map data © OpenStreetMap contributors (ODbL); report map errors at openstreetmap.org/fixthemap. Routing and street data by the Valhalla and OSRM servers of FOSSGIS, town lookup for Plus Codes by Nominatim.
Cara memakai Open NavG
Petunjuk arah di setiap belokan, lengkap dengan peta jalan, gratis di jam Garmin Anda. Bukan buatan Garmin dan tidak terkait dengan Garmin.
- Tambahkan layar Open NavG di aktivitas (sekali saja).
- Buat rute di HP.
- Tempel rutenya di slot, di pengaturan Open NavG.
- Buka aktivitas tanpa Start: jam mengunduh rutenya.
- Tekan Start dan ikuti panahnya.
Yang dibutuhkan
- Jam yang didukung (50+) dengan software terbaru. Cari jam Anda di langkah 1.
- HP (iPhone atau Android) dengan Garmin Connect yang tersambung ke jam. Internet di HP selama jam mengunduh rute.
- Open NavG terpasang dari Connect IQ Store (aplikasi Connect IQ).
Langkah 1. Tambahkan layar Open NavG (sekali saja)
- Open NavG adalah data field: satu layar di dalam aktivitas (Run, Bike, Walk …), bukan watch face atau aplikasi.
- Tambahkan lewat jam: aplikasi Garmin Connect sering tidak bisa memasang data field Connect IQ di layar data.
- Beri Open NavG satu layar sendiri dengan layout 1 kolom.
- Satu aktivitas paling banyak memuat 2 data field Connect IQ (FAQ Garmin). Nama kategori Connect IQ bisa sedikit berbeda, misalnya Connect IQ Fields (Forerunner 165, vívoactive 5).
- Naik motor? Baca Mode motor dulu.
Buka gaya menu jam Anda di bawah. Nama menu ditampilkan seperti di jam berbahasa Inggris dan bisa sedikit berbeda antar model dan versi software.
Menu gaya Venu 2 Venu 2 / 2S / 2 Plus, Venu Sq 2 / Sq 2 Music, D2 Air X10, Mercedes-Benz Venu 2 / 2S
- Dari watch face, tekan A (tombol kanan atas). Daftar aktivitas terbuka.
- Pilih aktivitasnya (Run, Walk …).
- Di layar awal aktivitas (Wait for GPS), usap ke atas (tanda panah di bawah) untuk membuka menu.
- Pilih Settings.
- Pilih Data Screens.
- Pilih layar yang jarang Anda pakai (di gambar: Screen 2) dan aktifkan layarnya.
- Pilih Layout dan pilih layout dengan satu kolom. Baris Layout lalu bertuliskan 1 Fields.
- Pilih Edit Data Fields, pilih kategori Connect IQ, lalu Open NavG.
Jalan lain: dari watch face tahan B → ⚙ → Activities & Apps → aktivitasnya → pengaturannya → Data Screens. Lalu lanjut ke langkah 6.
- Venu 2 Plus: ada tombol ketiga (C), langkahnya sama.
- Venu Sq 2 / Sq 2 Music: layar kotak, langkahnya sama.
- D2 Air X10: manualnya memakai Jalan lain (di atas). Pakai cara itu kalau langkah 1–3 berbeda.
- Mercedes-Benz Venu 2 / 2S: kami tidak menemukan manual Garmin tersendiri. Coba langkah Venu 2 dan kabari kami kalau menunya berbeda.
Sebagian gambar ini mengikuti foto atau video asli, digambar ulang dengan gaya sederhana kami. Langkah yang gambarnya tidak kami temukan digambar dengan gaya umum yang polos.
Manual Garmin: Customizing the Data Screens (Venu 2)
Menu gaya Venu 3 Venu 3 / 3S, vívoactive 5
- Tekan A (tombol Action).
- Pilih aktivitasnya (Run, Bike, Walk …).
- Di layar awal aktivitas (Wait for GPS), usap ke atas (atau pilih tanda panah di bawah) untuk membuka menu.
- Pilih Settings (pengaturan aktivitas).
- Pilih Data Screens.
- Pilih layar yang jarang Anda pakai (di gambar: Screen 2) dan aktifkan layarnya.
- Pilih Layout dan pilih layout dengan satu kolom.
- Pilih layarnya, lalu Edit Data Fields. Pilih kategori Connect IQ, lalu Open NavG.
- vívoactive 5: dua tombol, bukan tiga; langkahnya sama.
Sebagian gambar ini mengikuti foto atau video asli, digambar ulang dengan gaya sederhana kami. Langkah yang gambarnya tidak kami temukan digambar dengan gaya umum yang polos.
Manual Garmin: Customizing the Data Screens (Venu 3)
Menu gaya Venu 4 Venu 4, vívoactive 6, Venu X1, D2 Air X15, Approach S72
- Dari watch face, usap ke kiri (atau tekan START, tombol atas).
- Pilih Activities, lalu aktivitasnya.
- Gulir ke bawah dan pilih pengaturan aktivitas (misalnya Run Settings).
- Pilih Data Screens.
- Pilih Add New untuk layar baru (atau gulir ke layar yang jarang Anda pakai).
- Di layar itu, usap ke kiri, pilih Layout, lalu layout dengan satu kolom.
- Tap kolomnya, usap ke kategori Connect IQ, lalu pilih Open NavG.
- Kalau mau: usap ke kiri › Reorder supaya menjadi layar terakhir.
- Venu X1: layar kotak; layout dari 1 sampai 8 kolom.
- D2 Air X15: manualnya menyebut usap ke kiri dari watch face; sisanya sama.
- Approach S72: di langkah 2 pilih simbol aktivitas, lalu aktivitasnya.
Sebagian gambar ini mengikuti foto atau video asli, digambar ulang dengan gaya sederhana kami. Langkah yang gambarnya tidak kami temukan digambar dengan gaya umum yang polos.
Manual Garmin: Customizing the Data Screens (Venu 4)
Jam 5 tombol Forerunner 165 / 255 / 265 / 955 / 965, fēnix 7, epix, Enduro 2, MARQ, tactix 7, D2 Mach 1, Descent
- Dari watch face, tahan tombol tengah di kiri: UP di Forerunner, MENU di jam lain (bertuliskan UP·MENU, atau MENU·UP di Descent G2).
- Pilih Activities & Apps, lalu aktivitasnya (Run, Bike …).
- Pilih pengaturan aktivitas (misalnya Run Settings).
- Pilih Data Screens, gulir ke bawah, lalu pilih Add New.
- Pilih Custom Data (di Forerunner 165 jam lebih dulu menampilkan Choose Screen), lalu layout dengan satu kolom.
- Pilih kolomnya (Field 1), pilih kategori Connect IQ, lalu Open NavG.
- Kalau mau: Reorder supaya menjadi layar terakhir. Saat aktivitas berjalan, gulir ke layarnya dengan UP / DOWN.
- Jalan pintas (Forerunner 165 / 255 / 265 / 955 / 965): tekan START, pilih aktivitas, lalu tahan UP di layar awal aktivitas. Lanjut ke langkah 4 (ke langkah 3 kalau muncul menu dulu).
- Forerunner 955 / 965: tombol UP bergambar simbol menu.
- Forerunner 255 / 255S (juga Music): tanpa layar sentuh. Gulir dengan UP / DOWN dan pilih dengan START.
- Descent G2: tombolnya MENU·UP, item terakhir bernama Add. Pakai aktivitas yang bukan selam.
- Jalan pintas Descent G2 (terlihat di video Garmin): tahan MENU·UP di layar awal aktivitas, lalu lanjut ke langkah 4.
- Descent Mk3 / Mk3i: pakai aktivitas yang bukan selam (aktivitas selam diatur di Dive Setup).
- fēnix 7 / 7X Pro Solar tanpa Wi-Fi: tidak disebut di manual fēnix 7. Langkahnya semestinya sama; kabari kami kalau menunya berbeda.
Sebagian gambar ini mengikuti foto atau video asli, digambar ulang dengan gaya sederhana kami. Langkah yang gambarnya tidak kami temukan digambar dengan gaya umum yang polos.
Manual Garmin: Forerunner 165 · fēnix 7
Forerunner 70 / 170 / 570 juga 170 Music, 570 42 / 47 mm
- Dari watch face, tekan tombol kanan atas.
- Pilih Activities, lalu aktivitasnya.
- Gulir ke bawah dan pilih pengaturan aktivitas.
- Pilih Data Screens, lalu Add New untuk layar baru. (Atau gulir ke layar yang jarang Anda pakai dan pilih simbol Edit.)
- Pilih Layout dan pilih layout dengan satu kolom.
- Pilih Data Fields, lalu kolomnya, kategori Connect IQ, dan Open NavG.
- Tombolnya dinamai menurut letak (kiri atas, kiri tengah, kiri bawah, kanan atas, kanan bawah). Nama menu setelah Add New bisa sedikit berbeda.
Sebagian gambar ini mengikuti foto atau video asli, digambar ulang dengan gaya sederhana kami. Langkah yang gambarnya tidak kami temukan digambar dengan gaya umum yang polos.
Manual Garmin: Customizing the Data Screens (Forerunner 570)
Approach S50 dan S70 S50, S70 42 / 47 mm (S72: gaya Venu 4)
Approach S50
- Tekan tombol Top (atas).
- Pilih simbol More activities, lalu aktivitasnya.
- Pilih simbol Settings ⚙, lalu pengaturan aktivitas.
- Pilih Data Screens, pilih layar yang jarang Anda pakai, lalu aktifkan layarnya.
- Pilih layarnya, lalu Layout, dan pilih layout dengan satu kolom.
- Pilih layarnya, lalu Edit Data Fields, kategori Connect IQ, dan Open NavG.
Sebagian gambar ini mengikuti foto atau video asli, digambar ulang dengan gaya sederhana kami. Langkah yang gambarnya tidak kami temukan digambar dengan gaya umum yang polos.
Manual Garmin: Customizing the Data Screens (S50)
Approach S70
- Tekan tombol action.
- Pilih simbol More activities, lalu aktivitasnya.
- Pilih simbol Settings ⚙, lalu pengaturan aktivitas.
- Pilih Data Screens, lalu Add New untuk layar baru. (Atau usap ke layar yang jarang Anda pakai dan tekan tombol action.)
- Pilih Layout dan pilih layout dengan satu kolom.
- Pilih kolomnya, kategori Connect IQ, dan Open NavG.
Manual Garmin: Customizing the Data Screens (S70)
Gambar jam di atas hanya ilustrasi: tampilan di jam bisa sedikit berbeda. Nama menu ditampilkan seperti di jam berbahasa Inggris dan bisa sedikit berbeda antar model dan versi software.
Langkah 2. Buat rute
Dengan Perencana (disarankan)
- Buka Perencana di HP.
- Pilih tab:
- Ke tujuan: dari posisi Anda ke suatu tempat (lihat Apa saja yang bisa ditempel), atau tap peta. Jalurnya kurang pas? Tap garis biru untuk menambah titik, lalu geser ke jalan lain.
- Impor GPX: file rute (.gpx) dari teman atau klub lari, atau loop komunitas (bahkan gambar dari jejak GPS).
- Gambar: tap titik-titik di peta secara berurutan; rute mengikuti jalan.
- Kalau perlu (Ke tujuan dan Gambar): Hindari tol (sudah dicentang), Jarak terpendek, Pulang-pergi.
- Tap Salin kode rute.
Atau dengan angka Google Maps
- Di Google Maps, tahan jari di tujuan sampai muncul pin merah.
- Tap angkanya di kotak pencarian (atau panel bawah) untuk menyalin, misalnya
-6.2185, 106.8019. Tanda kurung dari aplikasi tidak masalah. - Tempel di slot (langkah 3).
Apa saja yang bisa ditempel
| Teks | Di slot (HP) | Di Perencana |
|---|---|---|
Kode Perencana NAVG2L:… (tombol Salin kode rute) | ✅ Terbaik: tanpa GPS | – |
Angka -6.2185, 106.8019, juga dengan kurung (-6.2185, 106.8019) atau 6.2185 S, 106.8019 E | ✅ Butuh GPS jam | ✅ |
Derajat, menit, detik 6°13'06.6"S 106°48'06.8"E | ❌ Pakai Perencana | ✅ |
Plus Code HQ76+H8 Banjarbaru (baris berisi Plus Code di halaman tempat di Google Maps: tap untuk menyalin) | ❌ Pakai Perencana | ✅ Paling mudah |
Link Google Maps yang panjang dari tempat yang dibuka (google.com/, dari address bar browser) | ❌ Pakai Perencana | ✅ |
Link pendek maps.app., teks dari tombol Bagikan, atau daftar hasil pencarian (…/maps/) | ❌ | ❌ Salin Plus Code atau angkanya |
| Nama tempat atau alamat, misalnya Gedung Sate | ❌ | ❌ Tidak dicari (nama di Google Maps dan OpenStreetMap sering berbeda) |
- Salin kodenya saja. Tanda kutip atau titik dari chat di ujung kode tidak masalah.
Langkah 3. Masukkan rute ke slot
Buka pengaturan
Di aplikasi Connect IQ di HP:
- 1 Tap Device (kanan bawah), lalu My Data Fields.
- 2 Tap Open NavG.
- 3 Tap Settings.
- Punya beberapa jam? Pilih dulu: titik tiga (kanan atas) → Select a Device.
- Lewat aplikasi Garmin Connect: More (kanan bawah) → Garmin Devices → jam Anda → Activities & Applications → kategori aplikasinya → Open NavG → Settings.
Isi slot
- 4 Halaman pengaturan, dengan 5 slot. Anda cukup mengisi baris ✏️.
- 5 Di slot yang kosong:
- ✏️ Route code (Kode rute): tempel kodenya
- ✏️ Route name (Nama rute): tampil di daftar jam
- ✏️ Mode: Run, Bike, atau Motorbike (Lari, Sepeda, Motor)
- 6 Tap Save (kanan atas), lalu OK. Slotnya tetap Empty (Kosong) sampai jam membacanya (langkah 4).
Gambar: aplikasi Connect IQ di iPhone, berbahasa Inggris (November 2026); dalam kurung: versi bahasa Indonesianya. Android bisa sedikit berbeda. Titik-titik menutupi kode dan nama rute kami.
- iPhone bisa menampilkan kodenya sebagai
navg2l:…(huruf kecil). Tidak apa-apa. - Download street maps (Unduh peta jalan): biarkan menyala. Kalau mati, rute baru tanpa peta jalan (peta yang sudah di jam tetap ada).
- Rute tetap di slotnya sampai kodenya diganti atau dikosongkan.
- ✏️ Active route (Rute aktif): lihat Pilih rute.
- Judul baris mengikuti bahasa HP, status mengikuti bahasa jam.
- Save gagal? Lihat Ada masalah?
Langkah 4. Unduh ke jam
- Di jam, buka aktivitas yang memuat layar Open NavG. Jangan tekan Start. HP tetap di dekat jam.
- Jam mengunduh tiap rute dan jalan di sekitarnya (sekitar 1 menit per 10 km).
- Getar pendek 2× = selesai. Tekan Back untuk keluar (tidak ada yang tercatat).
- Rute dan peta tetap di jam: HP boleh ditinggal.
Di HP (kalau mau)
- Saat mengunduh (Mengunduh slot 3: rute)
- Selesai (Semua rute sudah di jam)
- Dan di bawah tiap slot (Siap di jam)
- ✅ siap, ⏳ sedang diproses atau menunggu, ❌ perlu diperbaiki, ⬜ kosong.
- Halaman ini tidak diperbarui otomatis: kembali, lalu buka Settings lagi.
- Menempel angka Google Maps? Jam perlu GPS dulu: keluar ruangan.
- Satu getar panjang, atau tidak bergetar? Lihat Ada masalah?
Langkah 5. Navigasi
Pilih rute
- Tekan Start dan gulir ke layar Open NavG.
- Tap rute di Pilih rute:
- ✓ rute dan peta siap
- angka kuning (misalnya 12/40): peta masih diunduh
- ✗ abu-abu: rute belum ada di jam
- Panah ke start: menunjuk kembali ke tempat Anda memulai aktivitas
- kotak biru: rute yang sedang berjalan (sebelum Start: Rute aktif)
Atau pilih di HP:
- ✏️ Active route (Rute aktif): Slot 2
- Forerunner 255 / 255S (tanpa layar sentuh), atau tap di daftar tidak berfungsi: pilih rutenya di sini.
- ✏️ Active route (Rute aktif) → slotnya (atau Arrow to start / Panah ke start) → Save. Rute terbuka sendiri setelah Start.
- Diganti saat aktivitas berjalan (HP di dekat jam)? Rutenya ikut pindah.
- Off (tap on watch) / Mati (tap di jam): Anda memilih di jam.
Isi layar navigasi
- Belokan berikutnya: panah dan jaraknya. Bar kuning terisi saat makin dekat. Satu getar sekitar 20 m sebelumnya.
- Peta: rute di depan biru, yang sudah dilewati abu-abu, U untuk utara, sisa jarak.
- Keluar jalur (lebih dari 40 m selama sekitar 10 detik): panah dan garis merah menuju rute, dan getar. Kembali di rute: ✓ kembali ke rute.
- Sampai: getar panjang.
- Tap layar untuk membuka daftar rute lagi.
Mode motor
Cara pasang:
- Di jam: salin aktivitas Bike, lalu tambahkan layar Open NavG di salinannya (langkah 1).
- Di HP: ✏️ Mode Motorbike (Motor) untuk slotnya (langkah 3).
Yang berubah:
- Seluruh layar diputar 90°, jadi arah depan menunjuk ke tangan di setang (jam di pergelangan kiri).
- Peta diperkecil supaya terlihat lebih jauh ke depan, hanya jalan (tanpa gang).
- Getar belokan datang lebih awal saat melaju cepat: sekitar 3 detik sebelum belokan, minimal 30 m.
- Keluar jalur baru dihitung setelah 50 m dari rute, bukan 40 m.
Ada masalah?
| Yang terlihat | Yang perlu dilakukan |
|---|---|
| Pakai layout 1 kolom | Open NavG ada di layar dengan beberapa kolom. Pindahkan ke layar 1 kolom (langkah 1). |
| Rute belum di jam | Rutenya belum terunduh: ulangi langkah 4. |
| Satu getar panjang, atau tidak bergetar | Buka ulang pengaturan dan cari ❌ atau ⏳. Getar panjang: unduhan selesai, tapi ada slot yang perlu diperbaiki atau perlu GPS. Tidak bergetar: tidak ada yang terunduh (semua sudah di jam, ada slot yang mencoba lagi nanti, atau slot barunya perlu diperbaiki atau perlu GPS). |
| Isi nama rute | Isi ✏️ Nama rute lalu Save. |
| Kode rusak: salin ulang dari Perencana | Sebagian kode hilang saat ditempel. Salin ulang; rute yang sudah di jam tetap ada. |
| Kode tidak dikenali | Teksnya bukan kode Perencana atau angka Google Maps (angka dengan titik, seperti -6.2, 106.8). Lihat Apa saja yang bisa ditempel. |
| Perlu GPS: ke luar atau pakai Perencana | Keluar ruangan, atau buat rutenya di Perencana. |
| Tidak ada koneksi: buka Garmin Connect | Buka Garmin Connect di HP, pastikan Bluetooth dan internet menyala. Jam akan mencoba lagi sendiri. |
| Rute tidak ditemukan: coba titik lebih dekat, atau Perencana untuk rute jauh | Tidak ada jalur, atau tujuannya terlalu jauh (lebih dari sekitar 150 km lewat jalan). Buat rutenya di Perencana. |
| Unduhan dijeda selama navigasi | Ada rute yang sedang dibuka. Setelah sampai, tap layar (atau pilih Panah ke start), lalu unduhan lanjut. |
| Memori jam penuh atau hanya rute, peta penuh | Kosongkan slot yang tidak dipakai lagi. |
| Di HP: We are unable to update your setting | Masalah Garmin Connect, bukan rute Anda. Tunggu sekitar 30 detik, tutup aktivitas di jam, Save lagi, lalu buka ulang pengaturan untuk mengecek. |
Lainnya
- Perencana · Kebijakan privasi · Kode sumber dan laporan masalah (GitHub)
- Gratis dan open source, tanpa iklan, tanpa akun. Data peta © kontributor OpenStreetMap (ODbL); laporkan kesalahan peta di openstreetmap.org/fixthemap. Rute dan data jalan dari server Valhalla dan OSRM milik FOSSGIS, pencarian kota untuk Plus Code oleh Nominatim.